Make you own Homemade Condiments
Equipment needed:
Bowls
Whip
Fine-mesh cheesecloth
Large sieve
Food processor or blender
Double boiler or microwave
Tupperware or Mason jars
MAYO
2 egg yolks
1 to 2 tablespoons mustard
Dash salt and pepper
Squirt of lemon juice
1 to 1 1/2 cups olive oil
Add it all together and whisk until you get the desired consistency. I made this with 2 tablespoons mustard, although I would recommend starting with one and doing a taste-test.
MUSTARD
1/2 cup Colman's dry mustard
1/2 cup white vinegar
Mix together and let set overnight. Next day, beat:
1 egg
1/2 c. sugar
Pinch of salt to taste
Combine everything and cook in top of double boiler until thick. (Can also be done in the microwave.) Let cool.
KETCHUP
1/2 cup tomato sauce
1/4 cup sugar
1 tablespoon vinegar
Dash of salt
Blend well. Add more tomato sauce or salt, if needed to balance taste.
PEANUT BUTTER 1 cup dry roasted peanuts 2 tablespoons oil 1/2 teaspoon salt
Put everything in a blender and whip it up. If you want chunky peanut butter, remove 1/4 cup peanuts before blending the peanuts and oil. When the mixture is almost blended, add the nuts. Puree it a few more times, to break up the nuts and finish the blending. Optional additions: honey, macadamia nuts, pecans, sunflower seeds, chocolate chips. If the oil starts to separate and rise to the top, just turn the jar upside down or mix it up with a knife.
HUMMUS
1/3 cup fresh parsley leaves
2 strips lemon zest, 2 1/2 inches (bitter white pith removed)
3/4 teaspoons kosher salt
2 large garlic cloves
2 15.5 oz. cans chickpeas (garbanzos), drained, rinsed and drained again
1/4 cup tahini paste
3 tablespoons lemon juice
1/4 cups water
2 1/4 teaspoons ground cumin
2 tablespoons extra virgin olive oil
Chop the parsley in food processor, set aside. Pulse lemon zest and salt. Keep machine running and add garlic. Add chickpeas, tahini, lemon juice, water and cumin. Pulse to chop, then process 1 minute. Scrape the bowl and process again. With machine running, pour olive oil in slowly. Process 3 minutes. Add half the parsley and pulse to incorporate. Let the hummus sit for 30 minutes before serving. Sprinkle with remaining parsley and drizzle with olive oil, if desired.
RICOTTA CHEESE 2 quarts whole milk 1 cup heavy cream 1/2 teaspoon salt 3 tablespoons fresh lemon juice
Line a large sieve with a layer of cheesecloth and place it over a large bowl. Slowly bring milk, cream, and salt to a rolling boil in a 6-quart heavy pot over moderate heat, stirring occasionally. Add lemon juice, then reduce heat to low and simmer, stirring constantly, until the mixture curdles, about 2 minutes. Pour the mixture into the lined sieve and let it drain 1 hour. After discarding the liquid, chill the ricotta, covered; it will keep in the refrigerator 2 days.
SUPER EASY EXTRAS
EVERYTHING SAUCE
Buncha mayo
Squirts of lemon juice
Dill
Mix well. Serve with salmon or other fish. Also makes a great salad dressing and dip for sweet potato fries.
NOT-SO-SECRET SAUCE
Mayo
Relish
Ketchup
Mix well. Serve on burgers or whatever.
FRUIT DIP
Sour cream
Sugar
Mix until you've reached desired taste.
Sour Dough Starter
This starter recipe is awesome because it really works, and it explains
why it works. The starter I made is very good. The flavor is amazing and it rises very well. I purchased rye and wheat berries at my local health food store and ground them in a coffee grinder to make flour for my starter. It was kind of tedious to grind but I only needed a few tablespoons. I'm sure that you could just buy freshly milled flour at the health food store and it would work just as well. The wild yeast is on the grains and you just need to provide the right conditons to wake it up.
Procedure for Making Sourdough Starter
Day 1: mix...
2 T. whole grain flour (rye and/or wheat) 2 T. unsweetened pineapple juice or orange juice Cover and let sit at room temperature for 24 hours.
Day 2: add...
2 T. whole grain flour 2 T. juice Stir well, cover and let sit at room temperature 24 hours. At day 2 you may (or may not) start to see some small bubbles.
Day 3: add...
2 T. whole grain flour 2 T. juice Stir well, cover and let sit at room temperature 24 hours.
Starter at Day 3:
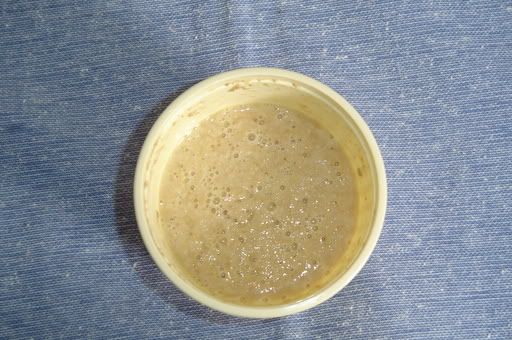
Day 4:
Stir down, measure out 1/4 cup and discard the rest. To the 1/4 cup add... 1/4 cup flour* 1/4 cup filtered or spring water
*You can feed the starter whatever type of flour you want at this
point (unbleached white, whole wheat, rye). If you are new to sourdough, a white starter is probably the best choice. All-purpose flour is fine--a high protein flour is not necessary.
Repeat Day 4:
Once daily until the mixture starts to expand and smell yeasty. It is not unusual for the mixture to get very bubbly around Day 3 or 4 and then go completely flat and appear dead. If the mixture does not start to grow again by Day 6, add 1/4 tsp. apple cider vinegar with the daily feeding. This will lower the pH level a bit more and it should wake up the yeast.
Starter at Day 7:
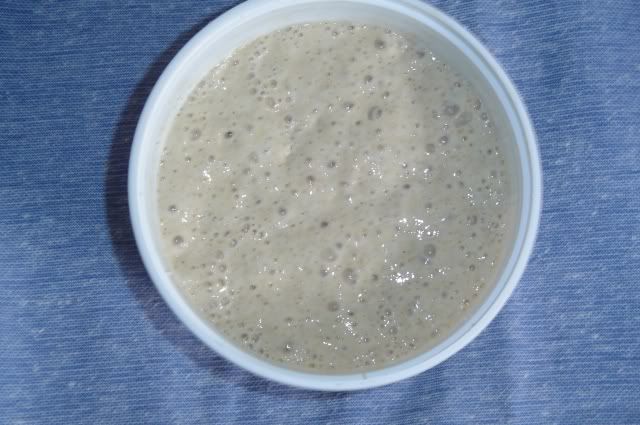
How it Works
The yeast we are trying to cultivate will only become active when the
environment is right. When you mix flour and water together, you end up with a mixture that is close to neutral in pH, and our yeasties need it a bit more on the acid side. This is why we are using the acidic fruit juice. There are other microbes in the flour that prefer a more neutral pH, and so they are the first to wake up and grow. Some will produce acids as by-products. That helps to lower the pH to the point that they can no longer grow, until the environment is just right for wild yeast to activate. The length of time it takes for this to happen varies.
When using just flour and water, many will grow a gas-producing bacteria
that slows down the process. It can raise the starter to three times its volume in a relatively short time. Don't worry--it is harmless. It is a bacteria sometimes used in other food fermentations like cheeses, and it is in the environment, including wheat fields and flours. It does not grow at a low pH, and the fruit juices keep the pH low enough to by-pass it. Things will still progress, but this is the point at which people get frustrated and quit, because the gassy bacteria stop growing. It will appear that the "yeast" died on you, when in fact, you haven't begun to grow yeast yet. When the pH drops below 3.5--4 or so, the yeast will activate, begin to grow, and the starter will expand again. You just need to keep it fed and cared for until then.
Once your wild yeast is growing, the character and flavor will improve if
you continue to give it daily feedings and keep it at room temperature for a couple of weeks longer. After that time, it should be kept in the refrigerator between uses/feedings.
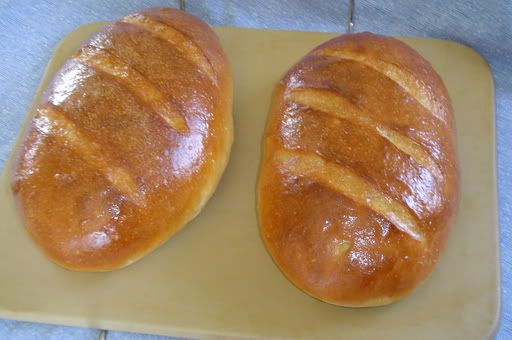
My First Loaves From New Starter:
 |
How to Make Sourdough Starter, and Making Sourdough
Grandmother Bread
Posted By Suzanne McMinn On January 9, 2009 @ 1:05 am In Breads,Grandmother Bread,
The Farmhouse Table | 71 Comments
Two loaves of whole wheat sourdough Italian herb & garlic bread cooling in my kitchen.
Who doesn’t love sourdough bread? You can make it at home easily–with Grandmother
Bread. Most of us think of San Francisco-style sourdough when we hear the words
sourdough bread, but sourdough is a type of riser, not a type of bread, which adds
a distinctively tangy flavor to the end product. Any bread recipe can be converted to
sourdough.
More about that later…. First we need to make the starter! Now if you want to really
go crazy, catch some wild yeast. You need a horse and a lasso– Okay, not really. You
need a big jar or bowl (non-metal), 1 1/2 cups of warm water and 2 cups of flour. Stir
it up good then let it sit covered with only a mesh material (to allow air flow into the
container) while you “catch” natural micro-organisms from the air.
If you’re like me and you have cats who will bother your container or you aren’t feeling
frisky enough to lasso yourself some yeast from the wild, you can take a packet (or a tablespoon)
of regular everyday “pre-captured” yeast from the store and go from there.
How to make Sourdough Starter:
1 tablespoon (1 packet) yeast (not rapid-rise)
1/2 cup warm water
1 1/2 cups all-purpose flour
1 1/2 more cups warm water
1 tablespoon sugar or honey
In a large (non-metal) bowl, dissolve yeast in the 1/2 cup of water.
Add flour, additional water, and the sugar or honey. Beat till blended.
You can leave it in the bowl to ferment, or transfer it to a large jar.
This is a 2-quart jar. You have to use a large bowl or a large jar because the starter needs
room to bubble up and expand.
Cover the top with cheesecloth. (That cheesecloth keeps the cat hair out, whew.)
I use a jar band to keep the cheesecloth on there good. Let stand at room temperature in
a warm place while it ferments. I keep it on the kitchen counter as that’s the warmest room
in the house most of the time. Depending on the temperature in your house, it will take
5-10 days to ferment. Stir the mixture 2 or 3 times a day. It should be kinda like pancake
batter in consistency (after stirring). It may separate some and look goopy as it sits. Just keep
stirring it up a couple times a day.
You see how much it expands. That’s why you need a large bowl or jar. I like to use this
2-quart jar because later it will transfer easily to the refrigerator. (A big bowl would take up
too much of my fridge space.)
You’ll know it’s ready when you walk by it one day and think, Is there some beer in here? And
you get all upset because you have teenage boys and they’d better not have any beer. Then you
look around and realize it’s the starter.
Once the starter is ready, you can store it in the refrigerator. (Continue to cover with cheesecloth.
You can use a rubberband, or a jar ring, etc, but do not seal it shut.) Stir it once a day.
After each use of the starter, replenish it by stirring in another
1/2 cup warm water,
1/2 cup flour, and
another teaspoon of sugar or honey. Allow starter to sit out for a day to ferment before
putting back in the refrigerator. Wait at least a couple days before using the starter again.
If you don’t use the starter for 10 days, stir in a teaspoon of sugar or honey to keep it active
and stick it back in the fridge.
Never take more than two uses of the starter at a time. Each use is 2/3 cup starter per one
loaf recipe. You can take out double that (1 1/3 cups) if making two loaves, and in that
case replenish double, but no more than that or you’ll wear your starter down pretty quickly.
(If you need to make more sourdough bread than that at a time, you might want to run two pots.)
You can keep your starter going for a long time if you take care of it. If you don’t and if you
screw it up, just start over. It’s just yeast, water, sugar, and flour. It’s okay. If your house is
very cold, it will not work. I tried to get some starter going one winter at the old farmhouse
and it just sat there. Then I set it in front of the gas fireplace and it fried. There was no
winning for losing there. I keep my new farmhouse at 67 degrees in the winter and it takes
about a week to get starter going here, so unless you live in a freezing, drafty old farmhouse,
you can probably ferment starter any time of the year. If you do live in a freezing, drafty old farmhouse,
may I just say, I feel your pain and wait till spring to make starter. (I loved that old house anyway!)
Note: Always bring your starter to room temperature before using it in a recipe.
How to use Sourdough Starter in Grandmother Bread recipes:
The standard recipe must be modifed only slightly to make up for the addition of sourdough starter.
One-loaf sourdough Grandmother Bread
2/3 cup starter
1 1/3 cups warm water
1 teaspoon yeast (optional)
1/2 teaspoon salt2 tablespoons sugar
1/4 teaspoon baking soda4 cups flour*
Two-loaf sourdough Grandmother Bread
1 1/3 cup starter
2 2/3 cups warm water
1 tablespoon (1 packet) yeast (optional)
1 teaspoon sal
t1/4 cup sugar1/2
teaspoon baking soda
8 cups flour*
*Flour measure is approximate–you may need slightly more or less. Use what you need to get a
good, pliable ball of dough.
Follow general instructions for making standard Grandmother Bread. See full standard Grandmother
Bread recipe and instructions here. The starter goes in with the water/yeast mixture in the first step,
and the baking soda is added along with the flour.
You can also add up to three tablespoons of homemade dough enhancer per loaf (particularly
recommended if using whole grains).
Baking soda interacts with the starter, aiding the rise. And, in fact, you can eliminate the additional
yeast in the recipe if desired–if you are feeling all frisky and everything, because the starter itself
has yeast in it, remember. Your bread will rise without any additional yeast–if you’re willing to
wait three to six or more hours. Sourdough starter is actually a frugal way to stretch yeast, and
the longer rise will give you more of that tangy sourdough flavor. However, sometimes we can’t
wait all day for bread to rise, so don’t feel bad about adding the extra yeast and getting on with
dinner.
You can use sourdough starter in any Grandmother Bread recipe variation. Make cool San Francisco-lookin’ round or long loaves, or just make regular sandwich loaves. Make sourdough raisin bread. Sourdough dinner rolls. Sourdough cinnamon crispies. Sourdough cheesy garlic breadsticks. Sourdough anything!
Non-Toxic, Frugal Way To Wash Your Hair Without
Buying Shampoo
Recipe #1: The Paste Method
1. In a small dish or ramekin, mix 2T of baking soda with a couple of tablespoons of warm water,
until it forms a thick paste. Add more water as needed – it should be a bit thinner than toothpaste.
(Note: I have medium-length hair, so you may need to adjust the amount of baking soda
if you have shorter or longer hair.)
2. Taking the paste into your hand, massage it into your dry scalp. Massage your scalp all over,
for at least 30 seconds. (This will probably feel pretty good!)
3. Leave on your hair for a minute or two. Then rinse well.
4. In an old (and well rinsed) shampoo bottle, mix 1 part Apple Cider Vinegar to 4 parts Water.
You can add essential oils or herbs if you like.
5. Coat your scalp and hair with the vinegar, and allow to sit for at least 30 seconds.
6. You can either rinse or leave it in your hair. (I rinse.)
Recipe #2: The Simple Method
There are two reasons why I switched to this recipe: 1. The paste idea was a bit messy for my
taste, and 2. The apple cider vinegar smelled too strong for me. I’m much happier with this version!
1. Use an old shampoo bottle (well-rinsed) or a squeeze bottle of some variety
(I reused one we’d bought from a local kitchen supply store). Mix 1 part aluminum-free
baking soda to 3 parts Water. Each time you use this solution, shake well to mix.
2. Squeeze the baking soda solution onto your dry scalp, then massage your scalp for several
seconds.
3. Leave in for 1-3 minutes, and rinse completely.
4. In an old shampoo bottle (well-rinsed) or a squeeze bottle, mix 1 part Organic White Vinegar
to 4 parts Water. You can add essential oils or herbs if you like – I add 1 cinnamon stick
(which lasts through several bottles of mixture) and 1/2 t vanilla. This masks the vinegar
smell, and leaves your hair smelling spicy and lovely.
5. Leave on hair for several seconds, then rinse.
Did You Know? (Vinegar and Hydrogen Peroxide)
by Back to the Basics--Hope for the best, Prepare for the Worst on Tuesday, April 5, 2011 at 2:47pm ·
You have to keep each in a separate spray bottle and then spray both, one after the other."In tests performed
at Virginia Polytechnic Institute and State University, combining the 2 mists eliminated virtually all Salmonella,
E. coli bacteria or Shigella on heavily contaminated foods and surfaces when used in this manner, making
this spray combination more effective at destroying these potentially deadly bacteria than any commercially
available kitchen cleaner or chlorine bleach. .
It doesn't make a difference which one you use first - you can spray either with the hydrogen peroxide
followed by the vinegar, or with the vinegar and then the hydrogen peroxide. When cleaning fruits or
vegetables, simply spray them well first with both the vinegar and the hydrogen peroxide, and then
rinse them off with tap water. Neither is toxic to you even if a small amount were to remain on the produce.
Keep a spray bottle of each of these on your kitchen counter and feel very good about the sanitizing and
cleaning they do.
Homemade Natural Diaper Cream & Lotion
By Voicefor Theunheardcry in Lady Preppers USA ·
Edit Doc · Delete
Raw shea butter - Photo courtesy of Mountain Rose Herbs
Coconut oil and raw shea butter are the perfect combination for a safe, natural and simple diaper cream
or hand lotion. Shea butter is wonderful for its natural healing and moisturizing properties. It is rich in
Vitamins A, E, and F, which help to soothe, hydrate, and balance the skin. Make sure to select raw
shea butter, because many companies use bleaches, deodorizers, or chemicals to alter the scent and
appearance of shea butter. These processings deplete the product of its healing and medicinal properties,
and also destroy the vitamins and minerals present. You will know if it is raw by its distinguished nutty smell.
Coconut oil is also very nourishing and moisturizing to the skin and has great anti-bacterial and anti-fungal
properties.
This is definitely a powerhouse for defeating yeast infections as well. We love it now! I used to have to
switch my babies over to disposables when a rash hit, but with this salve, it heals wonderfully even when
wearing cloth diapers. I recommend using a thick doubler/liner when applying this salve if you use cloth
diapers to protect their warranty. My dipes are out of warranty, so we use it directly on their bum with the
diaper and it has not caused any repealing issues. It washes out beautifully. This recipes works for a awesome
natural lotion as well, helping to sooth dry and cracked skin. You may want to add some lavender (or other)
essential oil for fragrance for use as hand lotion because shea butter gives it a nutty smell and may not be
preferred if you like a real fragrant lotion.
How to make your own?
1/8 cup coconut oil (extra virgin is preferred)
1/4 cup raw shea butter
3-4 Tablespoons talc-free cornstarch or arrowroot power (optional, to thicken)
-Learn more about avoiding talc here.
Combine coconut oil and shea butter in a small bowl with a hand mixer or stick blender. You may have to
soften the shea butter just slightly over very low heat in order to incorporate them well together, but it
should combine well with a mixer. Add cornstarch or arrowroot a tablespoon at a time until you achieve
the desired thickness. It will look similar to a whipped icing.That’s it! Transfer to a small covered containe
r and place at your changing station. Keep a small portion in the diaper bag as well. Apply liberally with
each diaper change as a preventative and rash salve. There are many more complicated homemade varieties
out there, but this simple recipe has done the trick for us! Makes about 1 cup.
We buy our extra virgin coconut oil and raw shea butter from Mountain Rose Herbs. You can use refined
coconut oil on the skin as it is a cheaper variety. Unrefined is preferred for eating.
Make Your Own Lemon Dust Cloths
By Voicefor Theunheardcry in Lady Preppers USA ·
Edit Doc · Delete
Make Your Own Lemon Dust Cloths
by Back to the Basics--Hope for the best, Prepare for the Worst on Thursday, August 4, 2011 at 9:45am ·
http://www.re-nest.com/re-nest/how-to/how-to-make-your-own-lemon-dust-cloths-152936
What You Need
Materials
Water
White distilled vinegar
Olive Oil
Rags
Lemons
Airtight glass container
Instructions
1. Mix equal parts water and vinegar. Add a couple drops of olive oil.
2. Soak rags in the solution until fully saturated. I used old dishcloths that I cut into fourths
with pinking shears.
3. Wring out the rags leaving them just damp.
4. Lay the rags, and place a couple lemon rinds on each cloth.
5. Roll or fold the rinds into each cloth, and place into your glass container. Add an extra
lemon peel, and make sure lid is tight. Store until needed.
Additional notes: Once used, wash or boil the dust cloths and repeat the steps above for a new batch!
Steps for Making Cider Vinegar
By Voicefor Theunheardcry in Lady Preppers USA ·
Edit Doc · Delete
Steps for Making Cider Vinegar
The following steps must be followed to make a high-quality cider vinegar:
1) Make a clean cider from ripe apples.
2) Change all of the fruit sugar to alcohol. This is called "yeast fermentation."
3) Change all of the alcohol to acetic acid. This is called "acetic acid fermentation."
4) Clarify the acetic acid to prevent further fermentation and decomposition.
Step 1--Making Cider
Cider is made from the winter and fall varieties of apples (summer and green apples do no
t contain enough sugar). Fruit should be gathered, then washed well to remove debris. Crush
the fruit to produce apple pulp and strain off the juice. Use a press or cheesecloth for straining.
Adding yeast to activate fermentation is not essential, but will speed up the process. Special
cultivated yeasts are available for this purpose at wine-making shops and biological labs-
-bread yeasts are not recommended. To make a starter, crumble one cake of yeast into one quart of cider
. This makes enough starter for 5 gallons of cider; double the recipe proportionately when making more.
Steps 2 and 3--Making Alcohol and Acetic Acid
Pour all of the liquid into one or more containers to about three-quarters capacity; do not close the lids
e temperature at 60 to 80 degrees F. Full fermentation will take about 3 to 4 weeks. Near the end of this
period, you should notice a vinegar-like smell. Taste samples daily until the desired strength is reached.
on the containers. Stir the mixtures daily. Keep the containers away from direct sunlight and maintain th
Step 4--Filtering
When the vinegar is fully fermented, filter the liquid through several layers of fine cheesecloth or
filter paper--a coffee filter works well for this. This removes the mother of vinegar, preventing further
fermentation or spoilage of the product.
Storing Your Vinegar
The vinegar is now ready for storage in separate, capped containers. Stored vinegar will stay in excellent
condition almost indefinitely if it is pasteurized. To pasteurize, heat the vinegar before pouring it into
sterilized bottles, or bottle, then place in a hot water bath.
In both cases, the temperature of the vinegar must reach at least 140 degrees F to sterilize the product,
and should not exceed 160 degrees F. Use a cooking thermometer to ensure the correct temperature is
met. Cool the containers and store at room temperature out of direct sunlight.
Flavored Vinegar
Flavoring can be added to homemade vinegar just before bottling. Good examples of additives include
green onion, garlic, ginger, or any combination of dried or fresh herbs. To make flavoring, place
material in a small cheesecloth bag and suspend in the vinegar until desired strength is reached.
This will take about 4 days, except for garlic, which takes only 1 day. For every 2 cups of vinegar,
use one of the following: 1/2 cup crushed fresh herbs, 1 tablespoon of dried herbs, 2 large cloves of garlic,
or 8 small green onions. Other good flavorings include tarragon, basil, nasturtium, chives, mint, chervil,
borage, hot chilies, and raspberries. Adjust the amounts to taste, but be careful not to overload the vinegar.
Too much vegetable matter can destroy the acid and ruin the preservative quality of the vinegar.
Some flavorings may not go well with cider vinegar's distinct taste and color. When flavoring store-bought
vinegar, use more delicate or decorative flavors. When flavoring store-bought vinegar, you will still need to
pasteurize it and use sterile bottles.
Flavored vinegars taste great and have a beautiful color, making them excellent for use in salads. You will be
tempted to display flavored vinegar; however, be sure to keep your bottles out of direct sunlight, which will
destroy the flavor, acidity, and color of the vinegar.
Uses for Homemade Cider Vinegar
Because the acidity of homemade vinegars will vary, do not use them in foods to be canned or
stored at room temperature. Homemade vinegar is, however, excellent in salads, cooking, or freezer and
refrigerator pickled products.
Making your own baking powder and other stuff
By Voicefor Theunheardcry in Lady Preppers USA ·
Edit Doc · Delete
Making your own baking powder:
To make your own baking powder combine 1/2 teaspoon cream of tartar and 1/4 teaspoon baking soda.
This is equivalent to 1 teaspoon of commercial baking powder. If you are not using immediately,
add 1/4 teaspoon cornstarch to absorb any moisture in the air and to prevent a premature chemical
reaction between the acid and alkali.
Whipping Cream:
To get maximum volume when whippingheavy cream, first place mixing bowl and beaters in
the freezer for about 30 minutes.
Making your own cake flour:
To make one cup of self-rising flour, combine 1 cup (140 grams) all purpose flour with
1 1/2 teaspoons baking powder and 1/2 teaspoon salt.
Do you have the problem of chocolate chips, nuts, or dried fruit settling to the bottom of
your pan during baking?
If you have ever encountered this problem it was probably because your batter was not thick enough
to suspend the ingredients during baking. For thin batters, chop the nuts or dried fruit very finely befor
e adding them to the batter. Also, tossing these ingredients in a little flour will absorb any oils or water
from the nuts or dried fruit and may help to prevent them from sinking to the bottom of the pan during baking.
Flavored Sugars:
Flavored sugars are very expensive to buy, so next time you want vanilla or cinnamon flavored sugars make
your own. To make cinnamon sugar combine 1/2 cup (100 grams) granulated white sugar with
1 tablespoon ground cinnamon. Store in an airtight container. Forvanilla flavoredsugar combine
1 cup (200 grams) granulated white sugar with one vanilla bean. Store in an airtight container for
about a week before using, stirring it a few times, to evenly distribute the vanilla flavor.
Superfine (Castor) Sugar:
Superfine sugar can be expensive and hard to find. Make your own by taking granulated white sugar
and processing it in your food processor until it is very fine.
Baking Muffins:
When bakingmuffins always fill any unused muffin cups with a little water to prevent the muffin pan
from warping during baking.
For easy cleanup, line muffin cups with paper or foil muffin liners. An easy way to place the muffin batter
into the muffin cups is to use an ice cream scoop.
CocoaPowder:
What is the difference between Dutch-Processed and Natural Unsweetened?
There is a lot of confusion about these two types of cocoa powder. First off, both are unsweetened
although the two types are usually referred to as Dutch-Processed and Natural Unsweetened.
Dutch-processed or alkalized unsweetened cocoa powder is treated with an alkali to neutralize
its acids. Because it is neutral and does not react with baking soda, it must be used in recipes calling
for baking powder, unless their are other acidic ingredients in sufficient quantities used in the recipe. It has a
reddish-brown color, mild flavor, and is easy to dissolve in liquids. Its delicate flavor makes it ideal in baked
goods like European
cakes and pastries where its subtle flavor complements other ingredients. Droste, Lindt, Valrhona, Poulain
and Pernigotti are some popular brands. Natural unsweetened cocoa powdertastes very bitter and gives a
deep chocolate flavor to baked goods. Its intense flavor make it well suited for use in brownies, cookies and
some chocolate cakes. When natural cocoa (an acid) is used in recipes calling for baking soda (an alkali), it
creates a leavening action that causes the batter to rise when placed in the oven. Popular brands are
Hershey's, Ghirardelli, and Scharffen Berger.
How to Stop Sliced Apples from Browning:
To preserve the color of peeled and sliced apples, drizzle with a little fresh lemon juice.
Eggs in Baking:
Always use largeeggs in recipes where egg size is not given. The size of the egg used will make a
difference in the consistency of the batter and ultimately affects the outcome of the baked good.
Also, to achieve maximum volume when beating eggs, have them at room temperature.
Using nuts in baking:
Toasting nutsbefore using them in your recipes will enhance the nut's butteryflavor and gives them a
golden color with added crunch. To toast the nuts, spread on a baking sheet and bake in a
350 degree F (180 degree C) oven for anywhere between 8-20 minutes. The nuts are done when
they are light golden-brown in color and fragrant. The baking time depends on the type and size
of the nut. Nuts can be toasted in advance and stored at room temperature in airtight containers or
plastic bags for up to a week.
Is your baking powder and baking soda still fresh?
To test baking powder'seffectiveness: mix 1 teaspoon (5 grams) baking powder with 1/2 cup (120 ml
) hot water and the mixture should bubble immediately. Store in a cool dry place and it should be
replaced every 6-12 months.
To test baking soda's effectiveness: mix 1/4 teaspoon baking soda with 2 teaspoons of vinegar and
the mixture should bubble immediately.
How to Soften Hard Brown Sugar:
Brown sugarshould be stored in a thick plastic bag in a cool, dry place. Sometimes, though, brown
sugar does become hard. If this happens you can soften it by:
- Place a slice of apple in the plastic bag with the brown sugar. Seal and leave for a couple of days until
the brown sugar softens. Remove the apple.
- Place about one cup (215 grams) of hard brown sugar in a microwave proof dish, cover, and microwave
for 30 seconds to one minute, or until softened.
- Place brown sugar on a baking sheet and bake in a 250 degree F (120 degree C) oven for about
5 minutes, or until soft.
What to do with your overripe bananas:
If you have overripe bananas and don't want to bake with them right away, then freeze them whole
(in their peels), wrapped airtight, for up to 6 months. Or you can peel and mash them (in food processor),
stir in 1 teaspoon lemon juice for each banana, and freeze in an airtight container or bag.
What is Chocolate or Fat Bloom:
Have you ever opened a package of chocolate to find white spots/streaks or a dull gray film on the chocolate?
It is calledchocolate bloom and occurs when the cocoa butter in the chocolate has separated causing it to rise to
the surface of the chocolate. This happens when the chocolate is stored in a too humid or too warm a temperature.
Don't worry though, the chocolate can still be used and when the chocolate is melted the cocoa butter melts back
into the chocolate.
How to make powder eggs at home
- Powdered eggs are not only easy to make from home, they can also be used in many different recipes. Having them handy can also save time if you are baking in a hurry. Follow these simple steps to making your own powdered eggs.
- 1. Scramble your eggs in a bowl. Pour them in a saute pan and cook until done.
- 2. Drain the excess grease for a few minutes on a paper towel.
- 3. Break the eggs into tiny pieces.
- 4. Spread the eggs out onto a baking sheet.
- 5. Dry at 135 degreesF for at least 10 hours.
- 6. Run the eggs through a blender until they form a fine powder.
- 7. Store your powdered eggs either in a heavy plastic bag, or a jar with a tight lid.
- Cook your eggs in a light, non-stick spray, for quicker drying time.
No comments:
Post a Comment